Pages

Friday, April 3, 2026

How to Reduce Plastic Waste While Cleaning


The goal of housecleaning is to create a healthy living space for you and your family members. However, the process of cleaning your house can impact the world outside your home in profound ways.


Often, cleaning products are sold in plastic containers. While plastic bottles are convenient and seemingly safer than alternatives like glass, they damage the environment. Here’s how to reduce plastic waste while cleaning your home.

Why Cleaning Products Contribute Significantly to Plastic Waste


The process of making plastic bottles involves the use of natural gas or oil, stabilizing chemicals, coloring, and more. In addition to using the limited supply of raw materials, the manufacturing process itself uses additional valuable resources.


Once the cleaning products are used and the bottles are tossed in the trash, it can take anywhere from 450 to 1,000 years for the plastic to break down in a landfill. Many plastic bottles wind up in oceans, lakes, and rivers, impacting aquatic ecosystems. Recycling is an option, but the vast majority of these bottles are not recycled.


Microplastics are also a growing concern. Microplastics are tiny particles of plastics that are shed through the use of plastics and while plastics are degrading. These tiny pieces have been found in humans and animals, soil, water, and other areas.


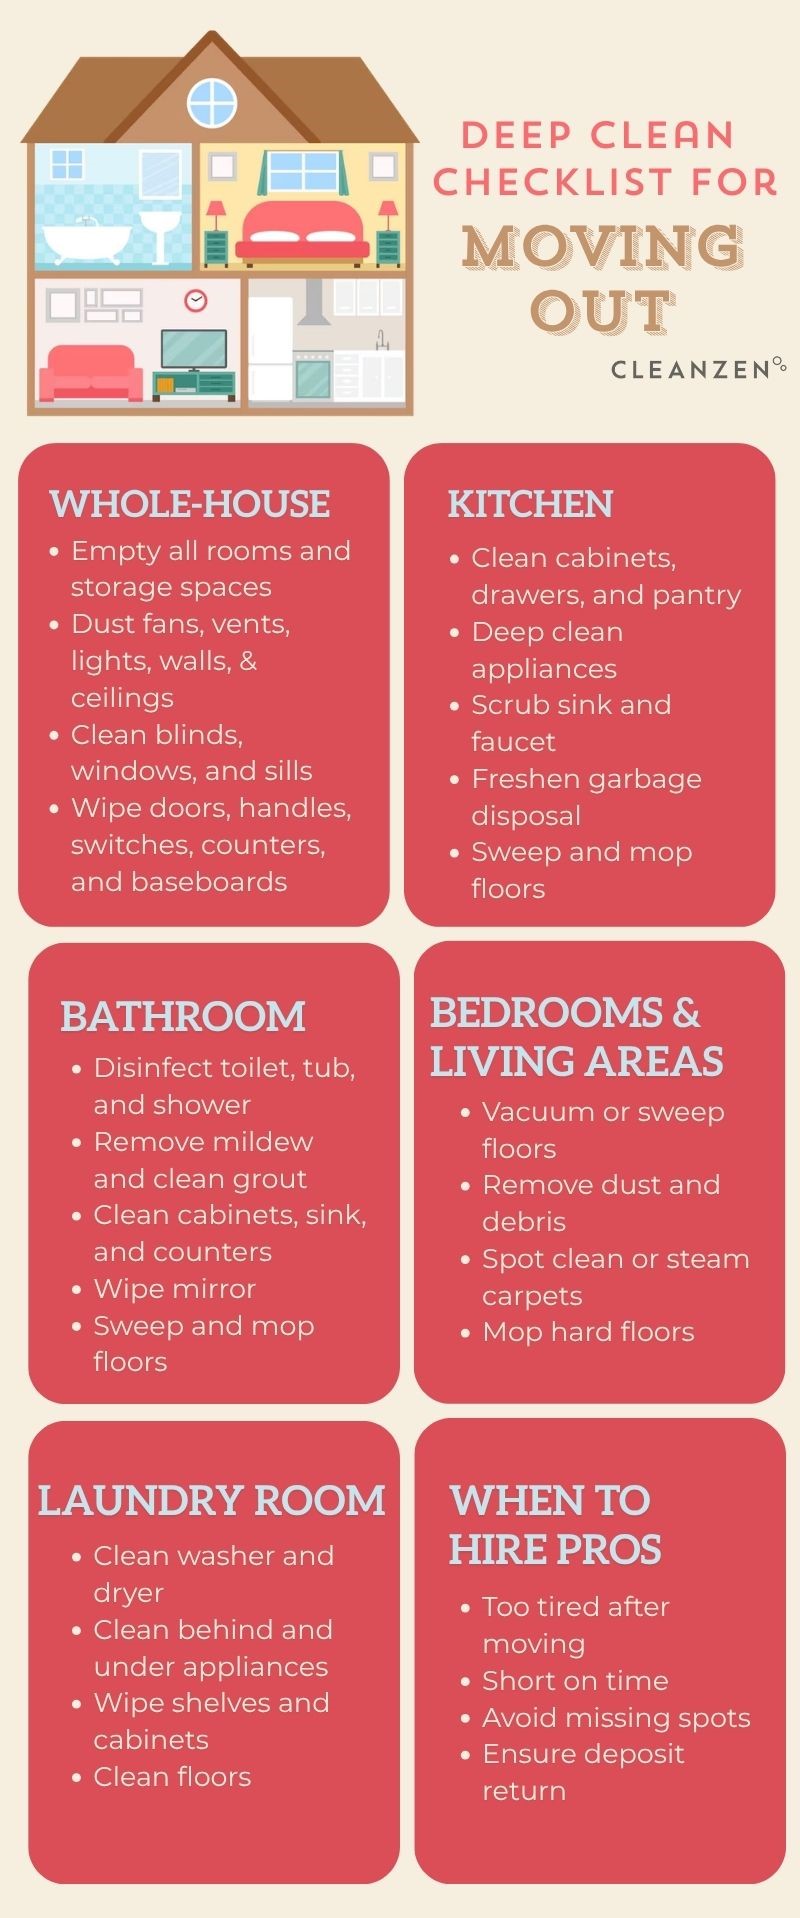
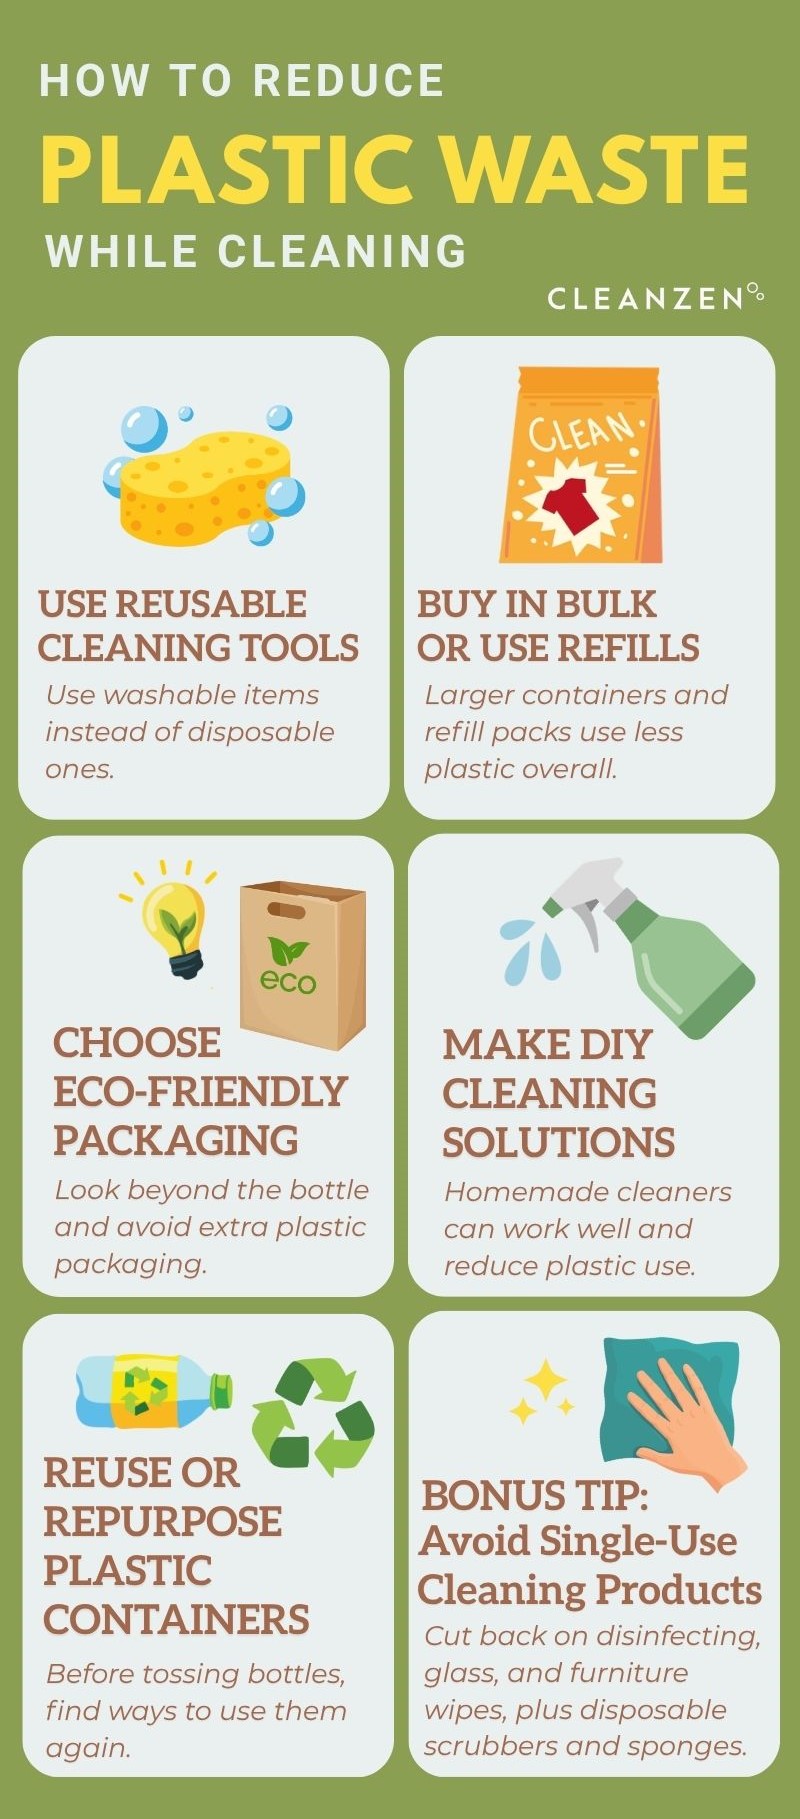
Eco-Friendly Cleaning Habits to Reduce Plastic Waste


The critical matter of plastic waste isn’t something to take lightly. While it’s seemingly easy to toss an empty cleaning bottle into the recycling bin, this doesn’t always happen as intended. Even when the bottle is placed in the proper bin, there’s the possibility that the bottle doesn’t actually get recycled. So, what are some cleaning habits you can use to reduce plastic waste?


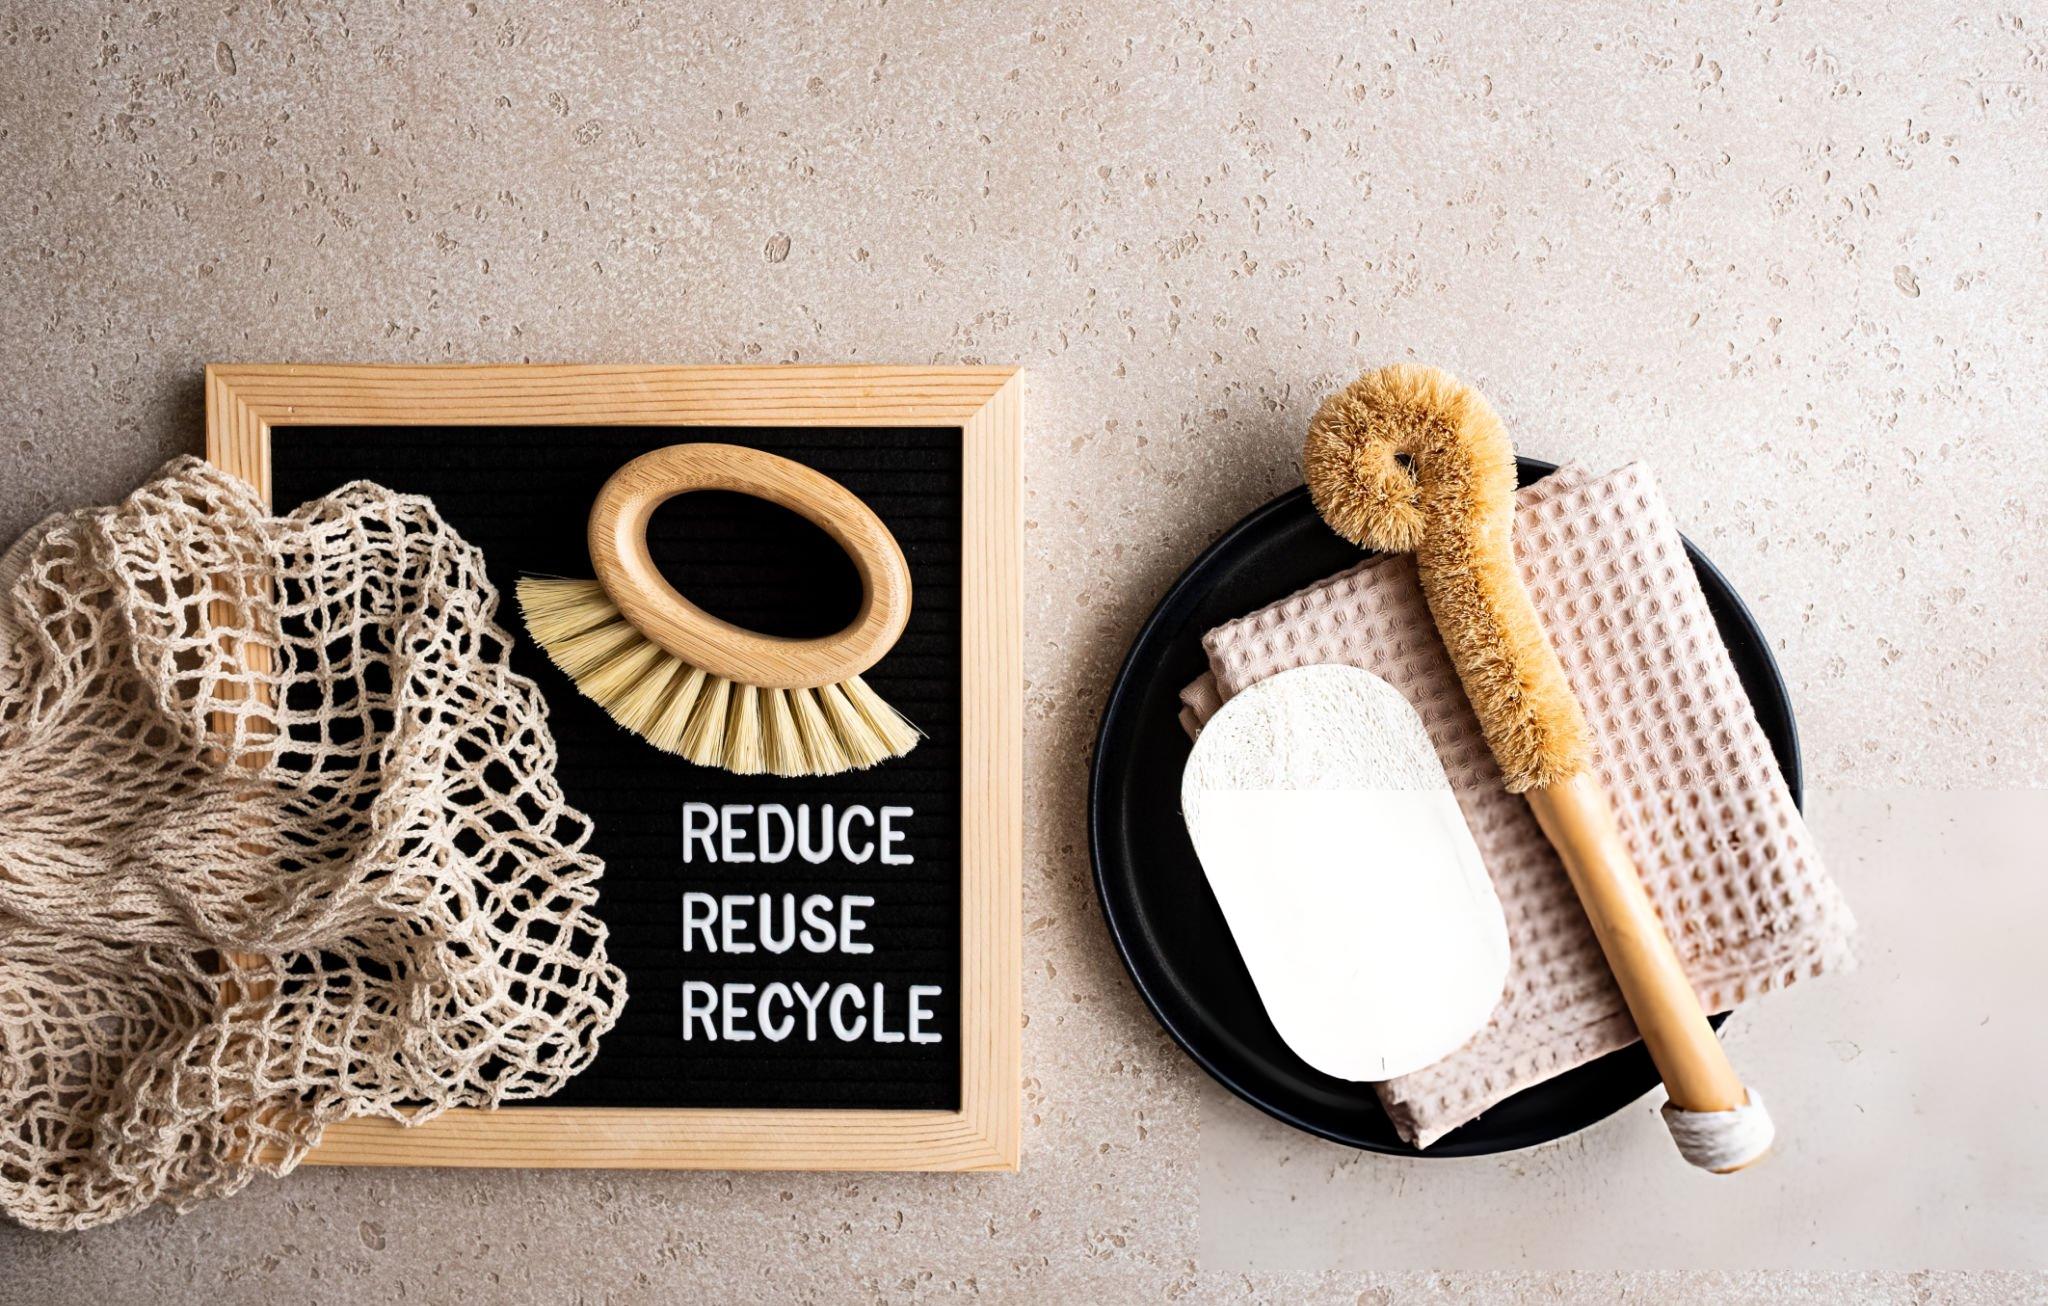
Choose Reusable Cleaning Tools


While disposable cleaning tools and supplies, such as the single-use pads used on some mopheads, are available, better options are available.


For example, some mops use a washable pad that can be used dozens or even hundreds of times before a replacement is needed. For all of your cleaning tools and supplies, look for reusable alternatives.


Buy in Bulk and Refill When Possible


It’s important to consider the amount of plastic used in the package in comparison to the amount of cleaning product stored in it. Generally, you’ll get more of the cleaning product using less packaging in a larger container.


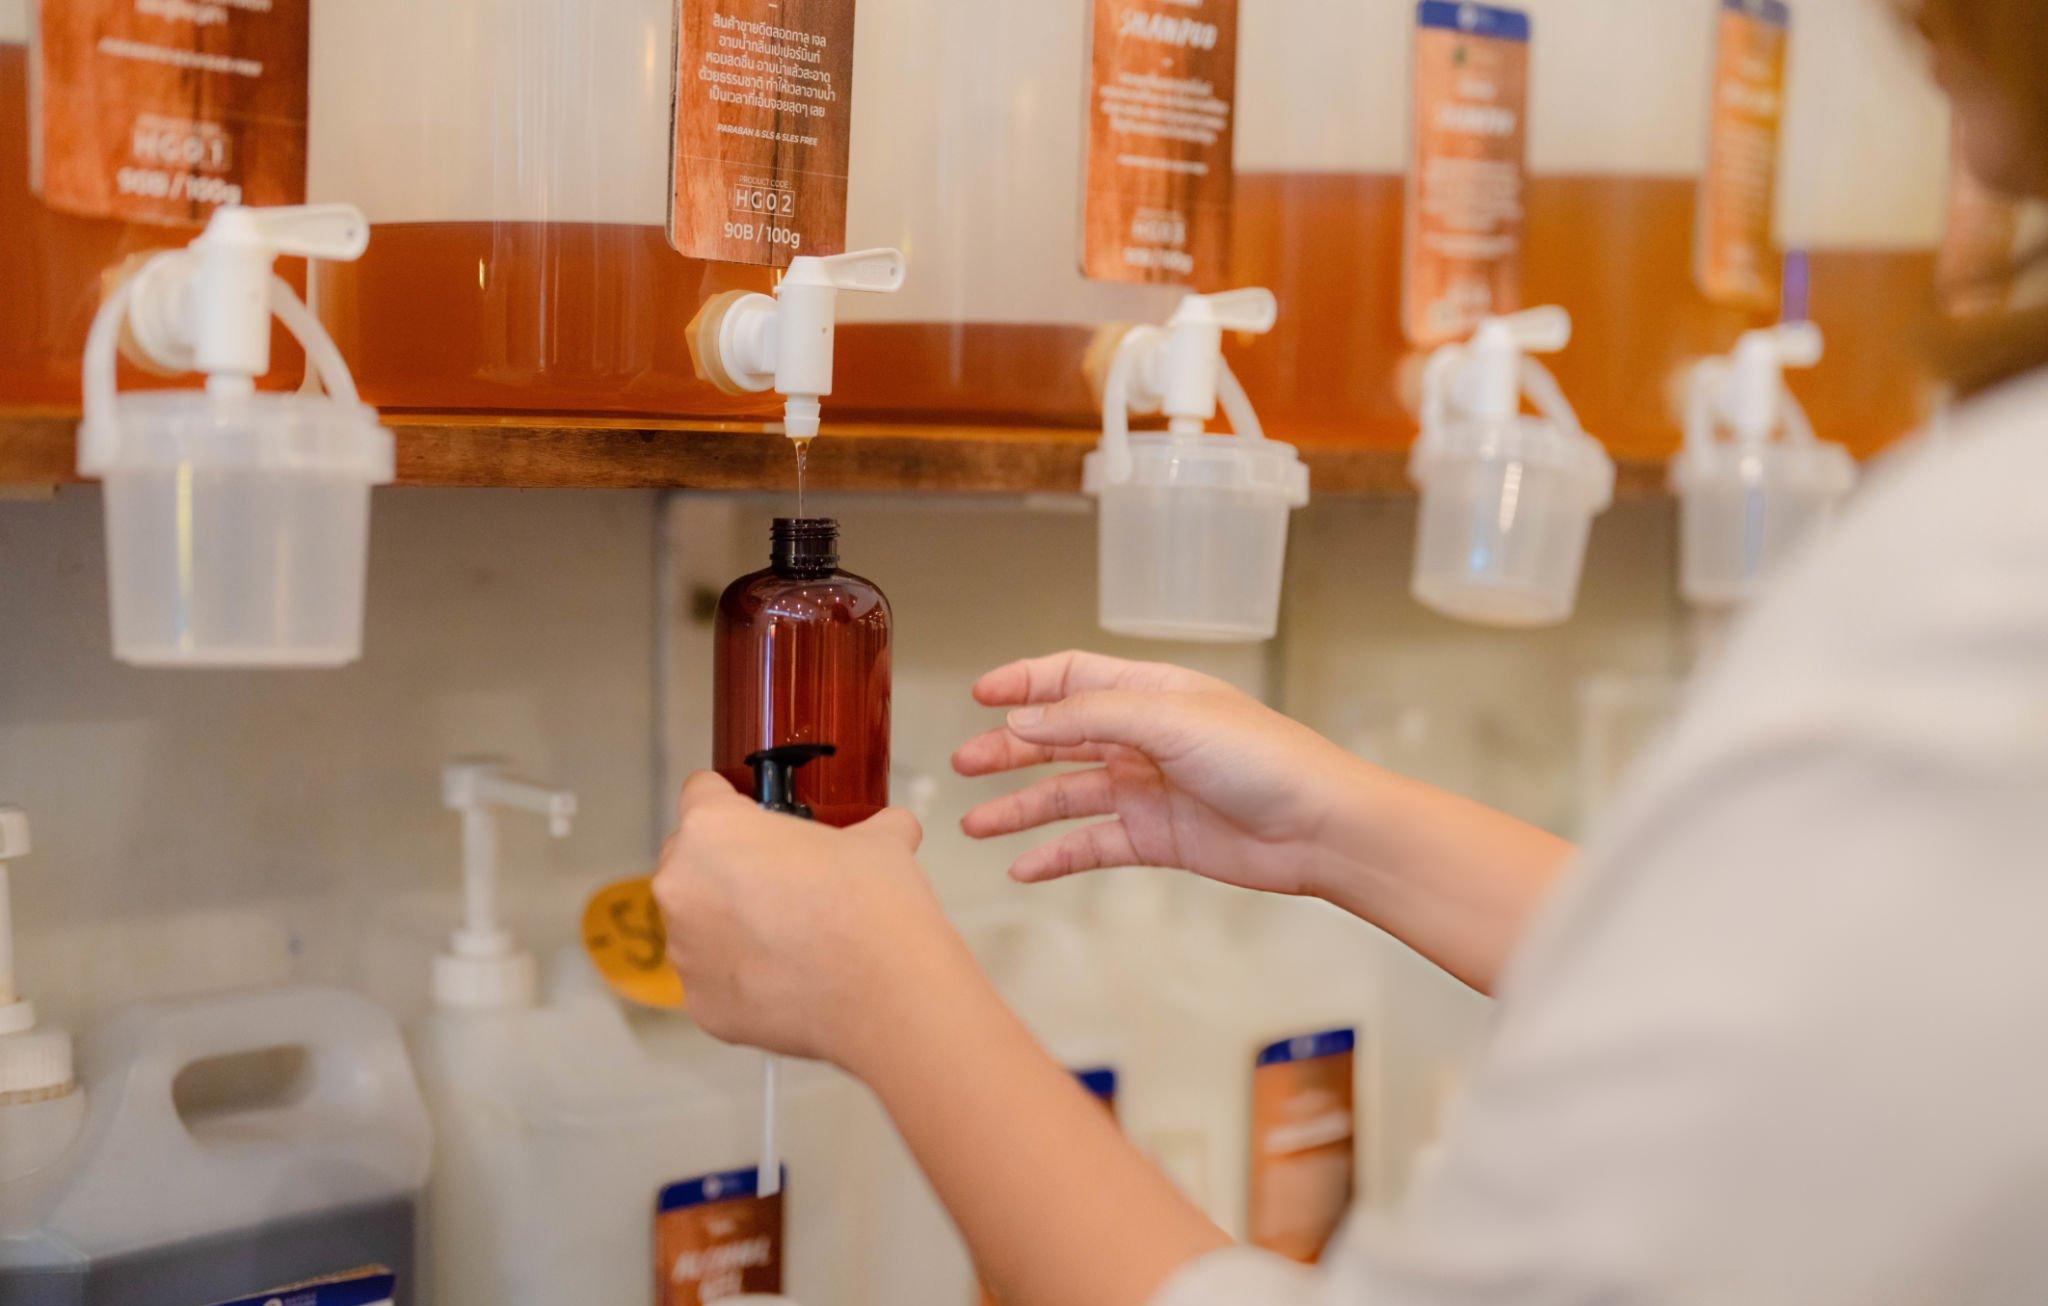
Consider buying larger containers and making bulk purchases of your favorite cleaning products. In addition, refill bottles are often sold in large quantities and can be used to reduce your use of plastics.


Opt for Eco-Friendly Packaging


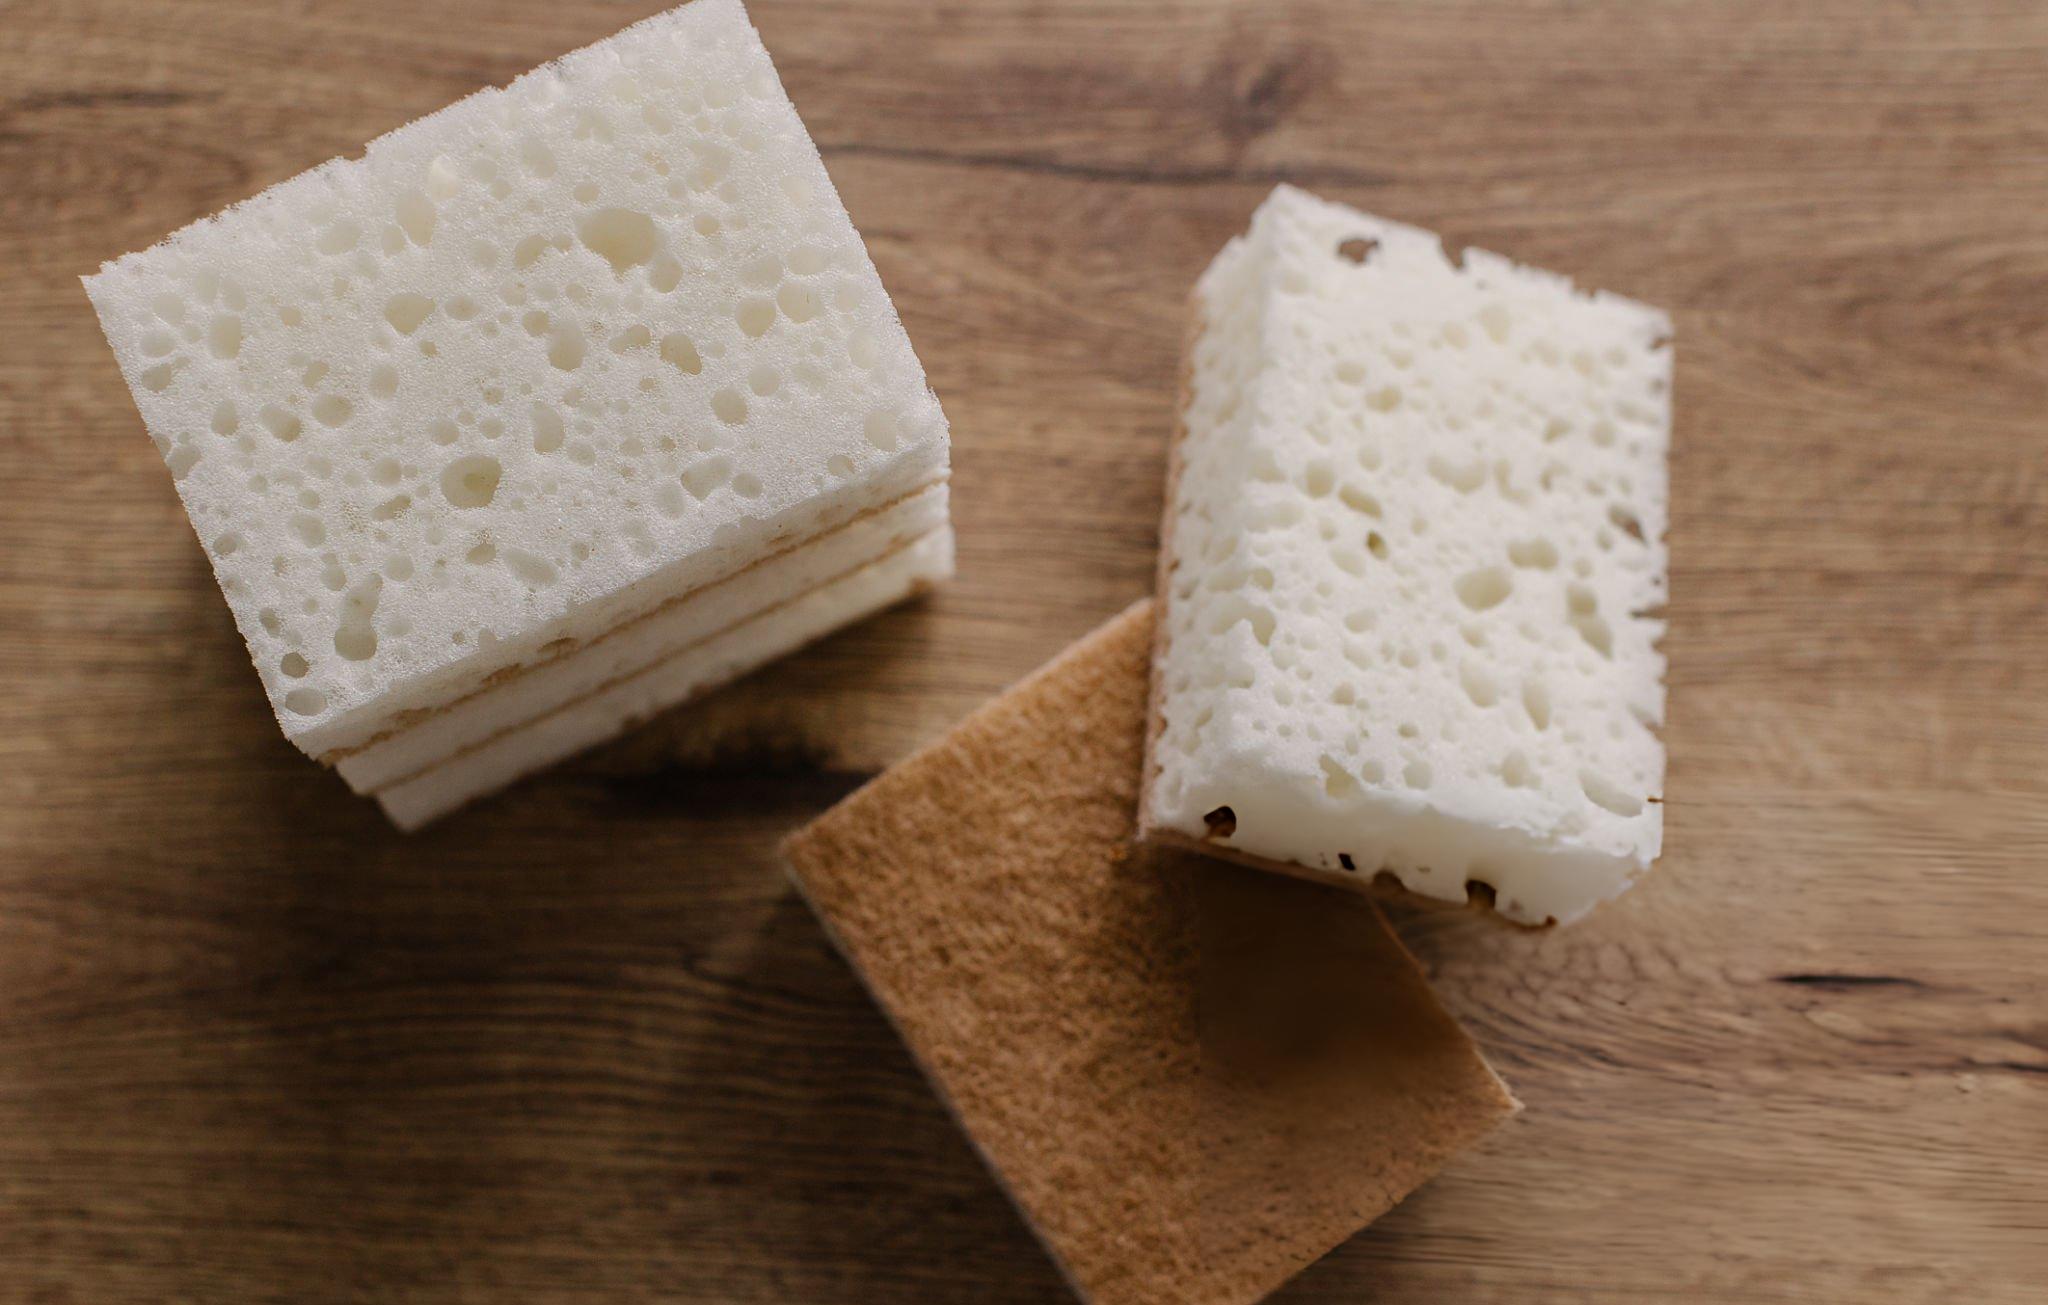
Plastic cleaning product bottles are only one source of harmful plastics in the housecleaning products. For example, some products, like sponges and cleaning tools, are wrapped in cellophane.


In addition to being made out of plastic, cellophone is known to release chemicals and pollute indoor air quality. Always pay attention to the product’s packaging. Choose products with minimal or no plastic materials.


Make DIY Cleaning Solutions


In some products, over 90% of the liquid is water. You don’t need to pay for a huge jug or bottle that’s mostly filled with water.


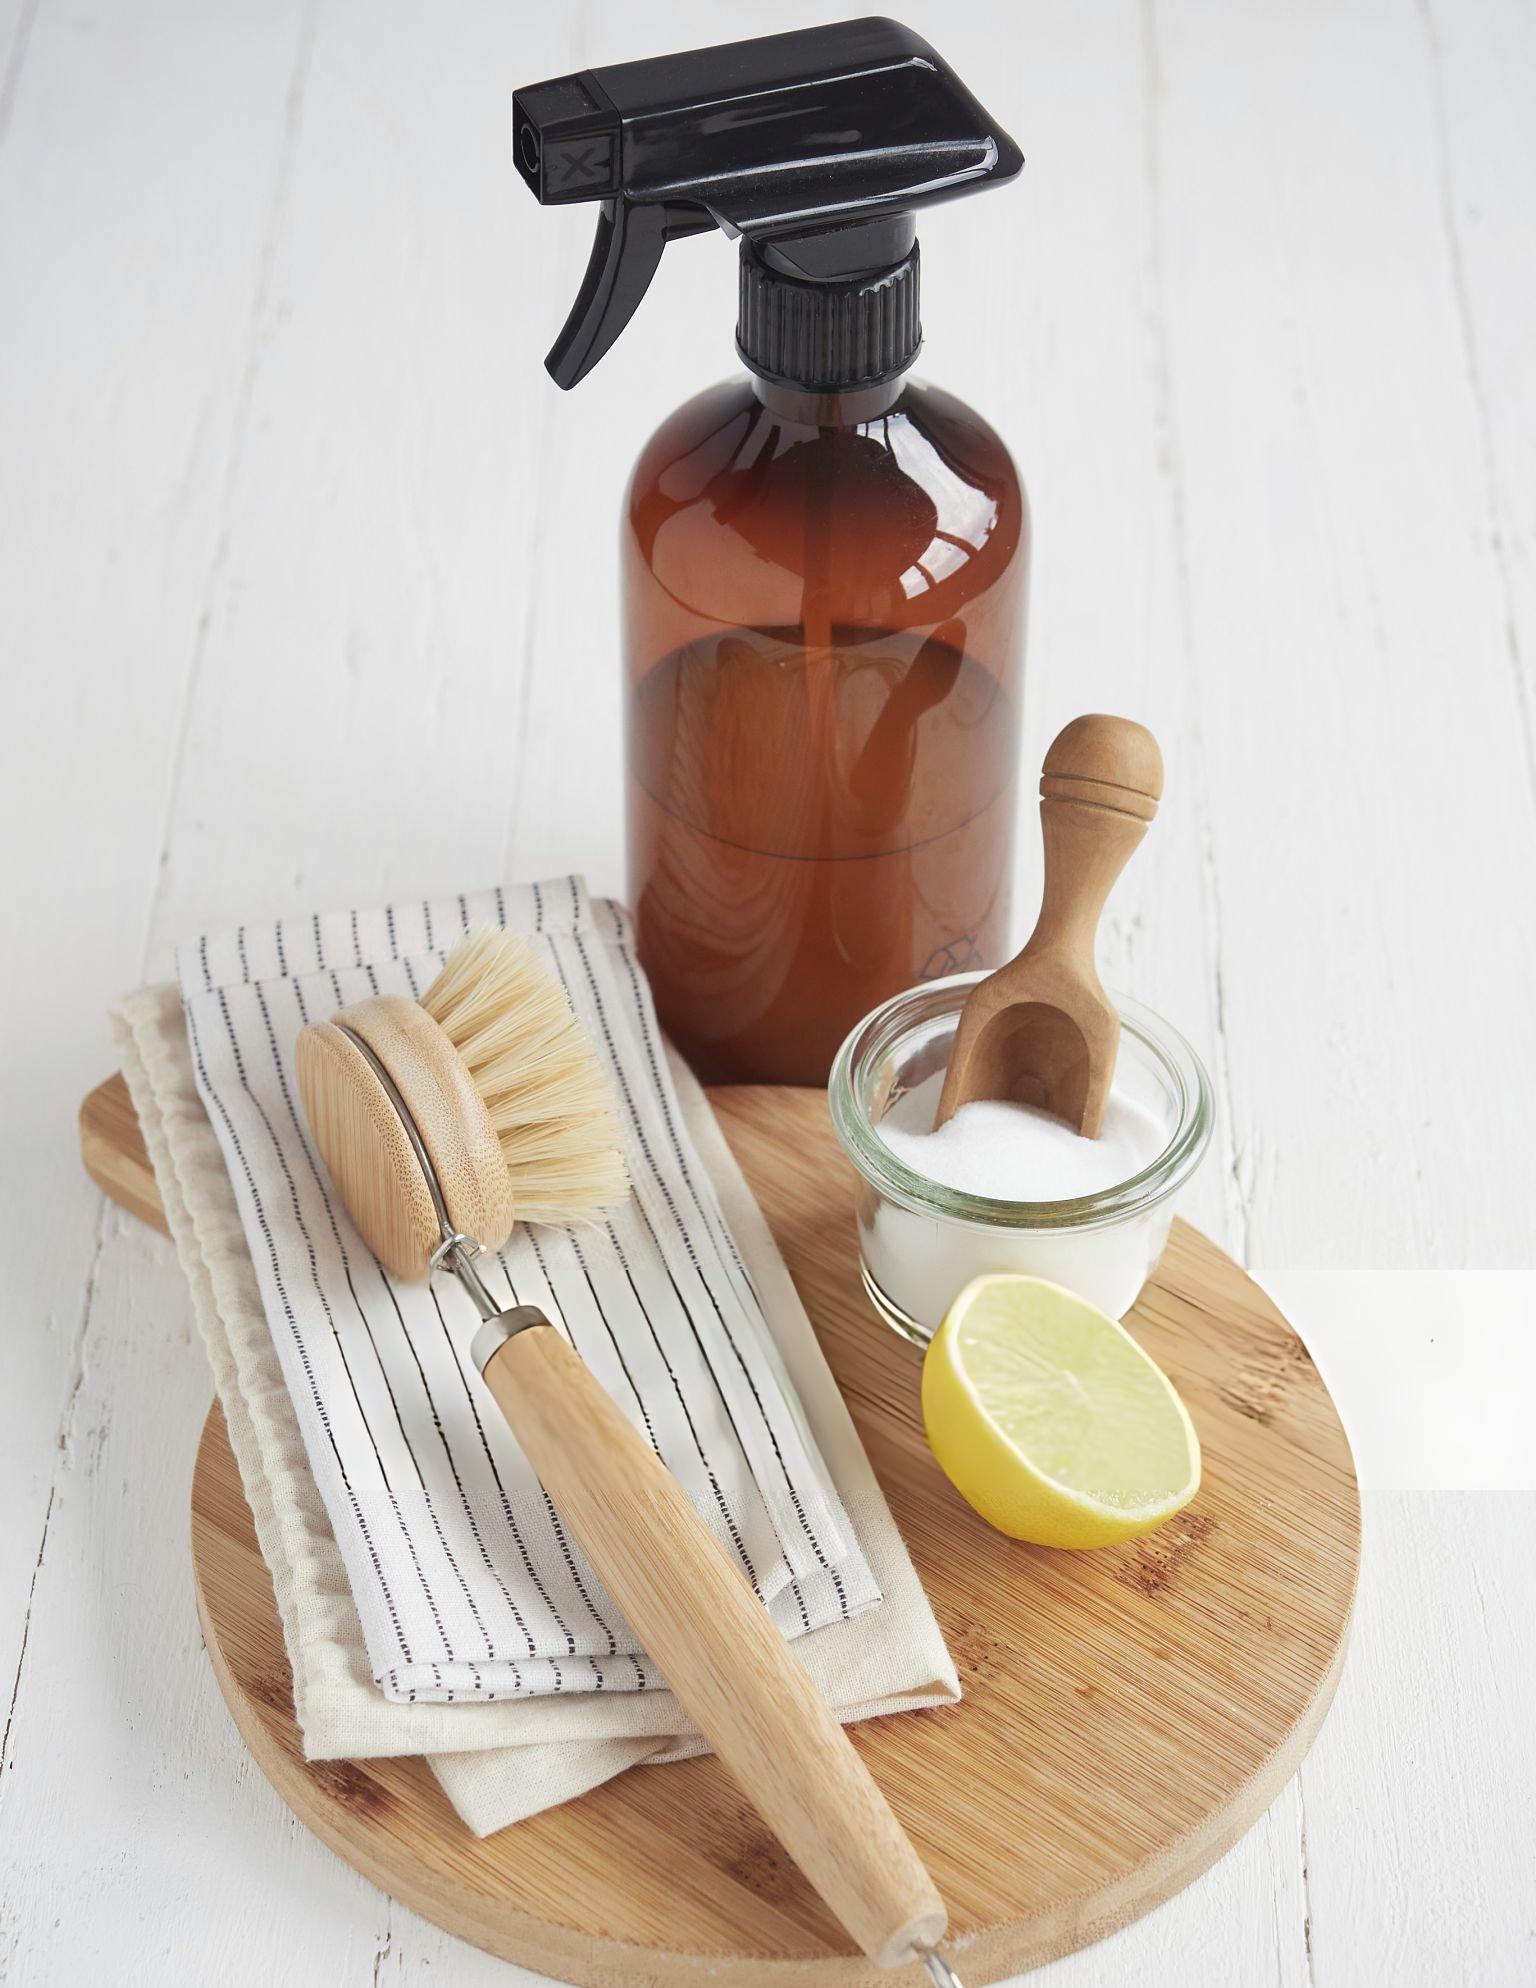
DIY cleaning products are just as effective as store-bought cleaners. These products often use natural ingredients, such as baking soda, vinegar, hydrogen peroxide, rubbing alcohol, and lemon juice.


Reuse and Repurpose Plastic Containers


If you choose to use cleaning products sold in plastic containers, consider reusing the containers rather than tossing them out. There are many creative ideas for reusing or repurposing these containers.


For example, some people turn them into bird feeders or piggy banks. Others use them to store everything from pens and pencils to magazines and even fresh flowers. Just be sure to thoroughly clean the bottles before re-using them.


Avoid Single-Use Products


In addition to the liquid cleaning solutions sold in plastic containers, some cleaning supplies are made out of plastic. Some of these items are disinfecting wipes, glass cleaning wipes, and furniture wipes. Others are intended for very short-term use, such as plastic scrubbers and sponges.


Consider using microfiber cloths and other materials that can be washed after each use.


While cleaning products are commonly sold in plastic bottles, you don’t have to resign yourself to being a part of the pollution and waste problem they contribute to. If you’re looking for a greener approach to house cleaning, we’re happy to help. At Cleanzen, we offer the option to use green cleaning products, tools, and techniques upon request, while still delivering the same pristine results our clients expect. If you’d like eco-friendly cleaning for your next appointment, just let us know when booking.

The post How to Reduce Plastic Waste While Cleaning appeared first on Cleanzen Cleaning Services.


source https://cleanzen.com/blog/how-to-reduce-plastic-waste-while-cleaning/

Thursday, March 26, 2026

Deep Clean Checklist for Moving Out


Regardless of whether you own or rent your current home, deep cleaning after moving out is essential. However, after moving all of your furniture, heavy boxes, and more from into your new home, cleaning is the last thing you’ll feel like doing.


In fact, it’s easy to gloss over this important job when you’re exhausted, sore, and short on time. Overlooking important cleaning chores, however, can have negative consequences. Here’s a complete deep clean checklist for moving out to ensure you cover all of your bases.

Why a Move-Out Deep Clean Is Important


If you own your current home, your sales contract may have a clause that requires you to deep clean your home after moving out. Failing to follow the terms of this legally binding contract can put you in jeopardy.


Even if your sales contract doesn’t specifically state this requirement, it’s common courtesy to remove all traces of your presence for the home’s next residents. After all, you wouldn’t want your new home to be filled with someone else’s grime.


Likewise, rental contracts typically include a cleaning clause. While some of these clauses dictate the use of a professional cleaning service, others simply require you to leave your old home clean.


Often, rental contracts dictate a specific cleaning fee or fine that you’ll be charged if you don’t comply with this requirement. On top of that, you probably won’t get your security deposit back if you leave the place dirty.


You don’t want to face fines or legal issues, and you don’t want bad juju following you. So, what should be included in your deep cleaning checklist?


Whole-House Cleaning


Before focusing fully on any specific room, take time to prepare your home with a few whole-house cleaning steps. You’ll need to ensure that everything is moved out of each room. This extends to closets, the garage, and even the attic and basement.


After your house is completely cleared out, follow these steps:

  • Remove screws and nails from the walls.
  • Fill small holes left behind. After the spackling paste dries, apply touch-up paint.
  • Use your vacuum’s handheld attachments or a long-handled microfiber duster to clean the ceiling fans, overhead light fixtures, ceiling, HVAC vents, and walls. Pay special attention to the corners where dust bunnies are more likely to gather.
  • Clean the blinds, windows, and windowsills.
  • Wipe down the counters, doors, door handles, and light switch plates.
  • Dust the baseboards.


Kitchen


The kitchen can be one of the grimiest areas of the house thanks to grease, food crumbs, mildew, and more.


Here’s how to deep clean your kitchen.

  • Wipe out all of the kitchen cabinets and drawers. If the debris is loose and dry, the easiest way to clean these areas is with your hand-held vacuum attachment. Wipe down the cabinet and drawer faces.
  • Follow the same step for the pantry.
  • Clean the dishwasher, fridge, microwave, oven, and stove on the interior and exterior.
  • Scrub the sink and faucet.
  • Disinfect and deodorize the garbage disposal.
  • After cleaning the rest of the kitchen, sweep and mop the floor.


Bathrooms


Even if you clean your bathroom weekly, it can look downright filthy after you move everything out of it.


Use these steps to remove the grime.

  • Disinfect the tub, toilet, and shower. Tackle mildew and dirty grout, if needed.
  • Vacuum or clean the interior of the cabinets and drawers. Wipe down the cabinet and drawer faces.
  • Use an all-purpose cleaner to clean the counter, sink, and faucet.
  • Clean the mirror.
  • Sweep and mop the floor.


Bedrooms & Living Areas


After removing your furniture, electronics, and clothes, you’ll likely be surprised by the amount of dust and debris that’s built up in your bedrooms and living areas. However, after you complete the whole-house cleaning steps listed above, your primary focus in these rooms is cleaning the floor.


Start by using your vacuum or a broom to remove loose debris. For carpeting, consider stain removal and carpet steaming or shampooing, as needed. For hard flooring, use a mop to clean the floor.


Laundry Room


It’s easy to overlook the laundry room when deep cleaning your home.


However, this small room requires your attention in these key areas:

  • If your washer and dryer will remain in the house, deep clean them on the interior and exterior.
  • Pull these appliances away from the wall to clean underneath and behind them.
  • Wipe down shelves and cabinets.
  • Clean the floor.


When to Hire Pros


If you’re confident in your ability to do a great job cleaning despite how exhausted you are from moving, you can save money doing the work yourself. However, if your schedule is jam-packed and you want to ensure that you won’t lose your deposit or face other consequences, it makes sense to hire pros to deep clean your home when moving out.


Moving is a major event that often takes months of planning. Even with the best planning, however, the process of moving everything you own to another home can be both stressful and exhausting.


You don’t need to add yet another thing to your plate when you’re relocating. Hand over the vacuum and mop to the experts at Cleanzen. To book deep cleaning service in Boston for your upcoming moving plans, call Cleanzen today.

The post Deep Clean Checklist for Moving Out appeared first on Cleanzen Cleaning Services.


source https://cleanzen.com/blog/deep-clean-checklist-for-moving-out/

Thursday, March 5, 2026

How to Plan Your Spring Cleaning


The mere mention of spring cleaning can strike you with dread. While you’lll undoubtedly love the end result of a beautifully cleaned and organized home, you’re likely focused on the time and effort required to get to that point. Spring cleaning is far more intensive than the routine cleaning you do every week. It involves thoroughly decluttering and organizing every closet, drawer, and cabinet.


At the same time, the chore extends to deep cleaning every nook and cranny of your home. This is a major undertaking, but the process can be simplified with the right plan of attack. Here’s how to plan your spring cleaning project.

Why Planning Makes It Easier and Less Stressful


Spring is a season of renewal. It’s the time to kick away the dust and grime that have been building up for months. After you get started spring cleaning, you might enjoy the feeling of accomplishment that comes with making progress on such a major project.


However, that doesn’t mean that the project can’t seem daunting from the get-go. This is a project that could take several long days of solid work to complete. Even when you get started, it’s easy to feel overwhelmed and want to throw your hands in the air.


The secret to making solid, steady progress and to avoid getting stressed and demotivated is to create a plan of action. With a spring cleaning plan, you’ll visualize the progress you make by crossing off the tasks as you complete them.


You can also create your plan so that the tasks are completed in the most time-efficient manner. For example, you might find it faster to declutter, organize, and clean one room at a time.


Set Clear Goals for Your Spring Cleaning


It’s important to consider your personality traits when making a cleaning plan. Do you prefer to complete small tasks quickly, or would you rather embark on a more in-depth project at once? If you prefer to do small tasks quickly, break down your cleaning plan by category.


For example, one step might include cleaning all of the ceiling fans throughout the house. The next step might include cleaning the windows in every room. Remember to make a plan that cleans your house from top to bottom for the best results.


On the other hand, if you know you can stay motivated to complete a bigger project at a time, a room-by-room approach may be a better option. Tackle all of the decluttering first and follow this up by organizing the room. After that, start cleaning at the ceiling and work your way down. When you’re done with one room, move on to the next room.


Make It Manageable and Stress-Free


If you’re the type of person who gets motivated by seeing results right away, start by focusing on the primary living space in your home. Chances are that you can’t complete spring cleaning your entire home in one day.


When you enjoy the incredible results you produced in your home’s main room, you’ll be more motivated to start cleaning the next room. The main living area in your home might be followed by the kitchen and your bedroom before moving on to the smaller rooms.


If you’re the type of person who can lose interest if you don’t see quick results, a different approach is recommended. Rather than tackling the largest room in the home first, set your sights on the smallest room. This might be a half-bathroom or even the hall closet. After seeing the great results in a small space, you’ll likely feel motivated to tackle a larger room next.


Decide If You Need Professional Help


In an ideal situation, you’d be able to block off several entire days to complete this big project at one time. For most people, however, time is in short supply. You might not be able to allocate more than a couple of hours at a stretch to spring cleaning.


If you don’t reasonably think that you can complete the project over the course of the next few weekends, don’t torture yourself with unnecessary stress. Recruiting professional help is a simplified, faster solution that might be best for you.


Depending on your personal schedule, your commitments, and the current state of your home, spring cleaning can seem like a bigger bite that you want to take. The good news is that you can easily cross this important to-do item off of your list by recruiting professional help.


At Cleanzen, we have a hardworking team of professional cleaners who are ready to get right to work in your home. Schedule Boston spring cleaning with us today.

The post How to Plan Your Spring Cleaning appeared first on Cleanzen Cleaning Services.


source https://cleanzen.com/blog/how-to-plan-your-spring-cleaning/

Friday, February 20, 2026

How to Prepare Your Home Before Your Cleaning Service Arrives


A professional cleaning service will leave you with a perfectly cleaned and fresh smelling living space that inspires satisfaction and relaxation. It’s a healthier space that is free of germs and allergens, and it can even improve focus, sleep, and more While your cleaning team will do the dirty work, there are a few steps you can take to get your home ready to be professionally cleaned.


These steps will allow your cleaners to work more efficiently and give your home a deeper level of clean. Let’s look at how to prepare your home before your cleaning service arrives.

Why Preparing Your Home Helps the Cleaning Process


When hiring a cleaning crew to work in your home, it might initially seem unnecessary to do some pre-cleaning work yourself. After all, you’re hiring cleaners to help you save time and give you an easy path toward a cleaner home. However, when you take a few steps upfront, the cleaners won’t have to work through clutter or risk damaging special items. They’ll have full access to the home without concern for access to utilities or working around your pets. You’ll get your home cleaned on your terms.


The good news is that it only takes a few minutes to prepare your home for a professional cleaning service. You’ll enjoy better results and greater efficiency from your cleaning team as a result. How can you prepare your home before the cleaners arrive?


Declutter, Secure Valuables & Fragile Items


While decluttering and cleaning go hand-in-hand when you do the work yourself, professional cleaners focus exclusively on the cleaning tasks. You want them to work on heavy-duty cleaning chores rather than spending time loading the dishwasher or tossing the kids’ toys in the toy box.


You also don’t want them to slow down to protect delicate items, and you don’t want to stress about the possibility of these precious items getting damaged. It’s best to declutter your home and put fragile and valuable items away before a professional cleaning service.


List of Priority Areas & Provide Cleaning Instructions


Your cleaning team will follow a standard cleaning plan unless they receive other instructions from you. While that plan covers most of the bases in many homes, it may not deliver the full results that you want.


Before your cleaning team arrives, create a list of priority areas that you want the cleaners to pay more attention to. If you have special cleaning instructions, such as for cleaning antique furniture, list these out as well.


Prepare Your Pets


Your pets can get underfoot and prevent the cleaners from working safely and efficiently. At the same time, the cleaning equipment and the presence of unfamiliar people can frighten or anger your pets.


As the cleaners carry cleaning equipment and supplies in and out of the home, there’s also a chance that pets could run out the front door. It’s best to secure your pets before your next cleaning service.


Ensure Access to Utilities


Your cleaners will need full access to water and electricity while they work. Ensure that every bathroom has functional faucets, toilets, and showers.


Also, move furniture or items that may block critical power outlets. While not every outlet needs to be accessible, a free outlet in every room is needed.


Consider Timing and Parking


Your cleaners will need to park as close to your front door as possible. If you live on a busy street or in an apartment with limited parking, consider scheduling a mid-day service when parking spots are more readily available. You should also choose a time that doesn’t interfere with your kids’ nap schedule, remote meetings if you work at home, and other inconvenient times.


Getting your home professionally cleaned is the perfect way to save time and enjoy the many benefits of having a cleaner home. At Cleanzen, our cleaning experts are ready to start working in your home, and we’ll deliver the results you expect. To schedule your next cleaning service with Cleanzen, contact us today.

The post How to Prepare Your Home Before Your Cleaning Service Arrives appeared first on Cleanzen Cleaning Services.


source https://cleanzen.com/blog/how-to-prepare-your-home-before-your-cleaning-service-arrives/

Thursday, February 5, 2026

Preventing Winter Mold and Mildew


While winter weather is notoriously cold with low humidity, the climate inside your home is far more comfortable. In fact, your home environment has a warmer temperature and more reasonable humidity.


While these conditions make for a cozy space on the dreariest days, they also make your home hospitable to mold and mildew growth. Cleaning up this growth can be a chore, so preventing winter mold and mildew is a top priority.

Why Winter Is Prime Mold Season


Mold and mildew are common throughout the year, but they can be even more problematic in the winter months. One reason for this is because warm air from your heater can create condensation around heating vents, windows, and other areas. The heat and humidity in your home aren’t limited to these areas.


In fact, because the conditions are ideal for fungi to grow, you might spot growth in areas where you least suspect.


Common Winter Mold Hotspots in Your Home


Condensation is one of the top reasons for mold growth on windowsills and frames. This is because the temperature difference between the frigid indoors and your indoor space produce moisture. This same condensation effect can happen near heating vents throughout your home.


In addition, other areas of your home are perfect for fungal growth throughout the year. These include high-humidity areas like the laundry room, bathrooms, and basement.


How to Prevent Mold and Mildew During Winter


The best way to handle mold and mildew is to prevent them from growing in the first place. You might assume that cleaning your house regularly with bleach will keep the fungi away, but this isn’t the case. In reality, bleach just removes the color of the fungi.


Here’s how to prevent mold and mildew in the winter and throughout the year:

  • Open the windows periodically. This improves air circulation to even out humidity levels in your home. In addition, it provides a route for mold spores to leave your home.
  • Improve ventilation in your home. The exhaust fans in your laundry room and bathrooms should be used frequently. Each time you shower, bathe, or run a load of laundry, you should turn on the exhaust fans. Keep them on for at least 15 minutes after you’re done.
  • Open the blinds. You might be inclined to keep the blinds and curtains closed on cold days. After all, they provide some level of protection against the cold permeating through the windows. However, they also trap cold air near the windows, which contributes to the condensation problem. Letting the sunlight in promotes even temperature distribution. Plus, natural sunlight can prevent mold growth.
  • Clean regularly. Keeping your home clean is essential for keeping your home free of mold and mildew. While bleach isn’t recommended for killing fungal growths, white vinegar is effective and safe for use on many surfaces.


Long-Term Strategies for a Mold-Free Home


There are two main strategies for a mold-free home. First, you need to keep everything in your home as dry as possible. Mold needs moisture to thrive, and this includes humidity in the air as well as liquid water.


In addition to running the ventilation system, take a minute to wipe down the shower walls after showering. Wipe off the counter and sink in the kitchen and bathroom after each use. If you’re aware of a slow plumbing leak, fix it as soon as possible. Deal with condensation by increasing air flow.


Second, you need to keep everything as clean as possible. This involves regularly cleaning your home, including using vinegar to kill fungi. Ideally, the moist or high-humidity areas of your home should be cleaned weekly. Fungal spores can live in your air ducts, so change the air filters every few minutes. The air ducts should also be cleaned every three to five years.


When to Call a Professional


Small areas of mildew and mold growth can be cleaned by you or professional cleaners. If you’re dealing with a larger area of concern, it’s time to schedule professional mold remediation. This minimizes health risks to you and reduces the spread of mold spores throughout your home.


If you don’t have time to give housecleaning the attention that it deserves, it makes sense to hire a professional cleaning crew. Remember that mold and mildew have potentially serious health consequences. In addition, they can lead to thousands of dollars or more of property damage in some cases.


Are you dealing with a mold or mildew problem in your home? With Cleanzen Boston cleaning services, you can tackle your mold problem without lifting a finger. More than that, we’ll continue to keep your home clean, so you don’t have to worry about mold and mildew in the laundry, bathrooms, and elsewhere. Contact our cleaning pros at Cleanzen today to schedule service for your home.

The post Preventing Winter Mold and Mildew appeared first on Cleanzen Cleaning Services.


source https://cleanzen.com/blog/preventing-winter-mold-and-mildew/

Monday, January 26, 2026

Cleaning Smart Home Devices


Smart devices have become veritable essentials in our lives. In fact, you might have a robot vacuum to clean the floor, smart lights that you can control from your phone, smart locks that you can access remotely, and many others.


Many of these devices, such as your displays and doorbell, may be used frequently and require regular cleaning. However, you need to clean them the right way to avoid damaging them. Let’s take a closer look at how to clean your smart home devices.

Why Cleaning Smart Home Devices Is Important


Smart home devices are used in and out of the home, and there is no safe space where they are free of dust and dirt. Some devices that are touched frequently may also be covered in germs, body oils, and more.


Cleaning these devices is essential for their overall functionality. Dirt and grime can scratch screens and affect sensors. They can also impact video and image quality. By cleaning your devices as recommended, you can prevent damage and get more life out of these often-expensive devices.


General Safety Tips Before Cleaning


Before you start cleaning any device, take a moment to read through the user instructions. Following the manufacturer’s recommendations will help you avoid unintentional damage and personal injury.


In addition, always unplug corded devices, such as your Echo or robot vacuum. For battery-powered or rechargeable devices, turn them completely off.


Cleaning Smart Speakers and Voice Assistants


Smart speakers and voice assistants require special care because of the tiny audio and microphone holes. These devices should be dusted with a dry microfiber cloth each time you dust your furniture.


For a deeper clean, dampen the cloth slightly with rubbing alcohol. Lightly rub the device to kill germs and remove grime. If you’re concerned about dust in the crevices, use a can of compressed air to propel the dirt out.


Cleaning Smart Displays and Screens


Most smart displays and screens are touchable devices, so smudges and germs are just as problematic as dust. These screens can also be cleaned with isopropyl alcohol and a microfiber cloth.


Keep in mind that the pulpy fibers in paper towels often leave behind fiber and smudges. Avoid moisture damage by using a lightly damp cloth and wipe the device with a second cloth to dry it.


Cleaning Smart Plugs, Switches, and Sensors


Smart sensors, plugs, and switches should be cleaned with great care. These sensitive areas can be damaged by abrasive materials and harsh cleaners. Wipe them clean regularly with a dry microfiber cloth. This step will minimize the frequency of more in-depth cleaning.


Compressed air can be used on plugs and switches. Avoid using moisture to clean these devices until the main power to the room is shut down. A small amount of isopropyl alcohol is generally safe to use for cleaning.


Cleaning Smart Security Devices (Cameras & Doorbells)


Your home’s outdoor security devices often get dirtier than indoor features. This is because they are exposed to the elements. If you need to use a ladder to clean overhead cameras and sensors, get a helper to hold the ladder for you.


While you can usually clean these devices with a small amount of isopropyl alcohol as well, you may need to use compressed air first to remove the loose debris first. Doing so will make cleaning much faster and easier.


How Often Should You Clean Smart Home Devices


Smart home devices that are touched frequently, such as those with touchscreen displays, should be cleaned weekly. If someone in your home is sick, you might clean them daily.


You should dust all of your smart home electronics weekly when you clean the rest of your home. Clean outdoor features monthly to optimize viewing and performance.


Common Cleaning Mistakes to Avoid


Once you get the hang of cleaning your smart devices, these steps will be second nature. However, there are a few common mistakes people make that can damage these devices. Here’s what you should know:

  • Don’t clean devices that are powered on or plugged into the wall.
  • Don’t use harsh chemicals.
  • Avoid getting moisture inside the devices.
  • Don’t scrub devices with abrasives brushes


If it feels like almost everything in your home has special cleaning requirements, there’s a good reason for this. From electronics to wood, marble, granite, glass, and more, everything has unique care instructions. At Cleanzen, we have the in-depth knowledge necessary to keep your home and belongings safe while delivering the clean space you need. For more details about Cleanzen housecleaning services, contact us today.

The post Cleaning Smart Home Devices appeared first on Cleanzen Cleaning Services.


source https://cleanzen.com/blog/cleaning-smart-home-devices/

Monday, January 12, 2026

Easy Home Cleaning Resolutions For 2026


The start of a new year comes with all of the possibilities of a fresh start, and this begins inside your home. It’s easy to put your cleaning and organizing tasks on the back burner while you tackle your important daily responsibilities, but that inevitably leads to more dirt and clutter than you want to contend with.


The good news is that you can achieve your goal of having a cleaner home this year. Check out these 5 easy home cleaning resolutions you can actually follow.

The Importance of Realistic, Manageable Goals


One of the top reasons why so many New Year’s resolutions fall to the wayside is because they simply aren’t realistic or manageable.


For example, you can tell yourself you’ll get out of bed every day at 4am to hit the gym before work, but that’s not realistic for many people to maintain on a long-term basis. Regardless of the goals that you set for yourself, those goals need to be scaled so that you can keep up with them. Set yourself up for success!


Tackle One Room at a Time


Whether you live in a one-bedroom apartment or a six-bedroom house, you can easily feel overwhelmed when you think about cleaning the entire space from top to bottom. Rather than creating a to-do list a mile long and trying to complete the full list in one day, focus on one room at a time.


For example, you might focus on dusting, vacuuming and mopping your bedroom on Monday and cleaning the bathroom on Tuesday. With big projects broken into small tasks, you’ll feel more accomplished and stay motivated to continue.


Make Daily 10-Minute Cleaning a Habit


You’re more likely to do things that are engrained in your daily routine. So, the key to staying on top of your cleaning goals is to make them habitual. For many people, it’s far easier to make and follow a new habit if it fits smoothly with the rest of your daily routine.


Think about how you can allocate 10 minutes of cleaning into your routine. Perhaps you can work on cleaning after work and before you make dinner. You might prefer to clean first thing in the morning after your coffee. Find something that works best for your schedule and preferences.


Declutter as You Go


Clutter is a never-ending problem. It creeps up without you even realizing it, and suddenly, your house is a chaotic mess. As part of your daily cleaning habit, simply spend a few minutes at the end of each day returning the items in your living room, kitchen, and bedroom to the places they belong.


This might include putting the kids’ toys back in a bin, returning an empty drinking glass to the kitchen, and picking up clothes on the bedroom floor. An alternative is to remove clutter as you walk out of each room throughout the day.


Create a Cleaning Playlist or Routine That’s Fun


While some people enjoy cleaning, it’s a tedious process for others. Regardless of which camp you’re in, you can actually have fun cleaning when you set the mood.


Just like you make a playlist for exercising, make one for cleaning. Add fun songs that make you smile, dance, and sing out loud. With your favorite songs playing, the chores will be done before you know it.


Invest in Tools That Make Cleaning Easier


Cleaning takes much longer to do (and can even be frustrating at times) when you don’t have the right tools for the job. You probably already have essentials, like a vacuum, mop, broom, and duster.


However, things like a microfiber cloth, a microfiber duster with an extension feature, a motorized scrubber, and other tools can truly lighten your load. It’s also a good idea to invest in a hand-held vacuum, which makes it easy to clean up small messes in between big cleaning sessions.


While many of your resolutions for the new year may be tossed aside before January ends, enjoying a cleaner home doesn’t have to fall into that category. If you lack the time, energy, or general motivation to stay on top of housecleaning chores, Boston maid service from Cleanzen is your solution. Contact our team today to book your first service with our expert-level cleaning team.

The post Easy Home Cleaning Resolutions For 2026 appeared first on Cleanzen Cleaning Services.


source https://cleanzen.com/blog/home-cleaning-resolutions/

How to Reduce Plastic Waste While Cleaning

  The goal of housecleaning is to create a healthy living space for you and your family members. However, the process of cleaning your hou...